3. expo屏幕导航(路由管理)
创建时间:2024-12-30 15:51
长度:3451
浏览:0
评论:0
expo提供了基于文件的路由框架Expo Router ,适用于 React Native 和 Web 应用。它管理屏幕之间的导航,并在多个平台上使用相同的组件。首先,我们需要了解以下约定
- app 目录:一个仅包含路由及其布局的特殊目录。添加到此目录的任何文件都将成为我们原生应用内的屏幕和网络上的页面。
- 根布局:app/_layout.tsx文件。它定义共享的 UI 元素,例如标题和标签栏,以便它们在不同的路由之间保持一致。
- 文件名约定:索引文件名(例如index.tsx)与其父目录匹配,不添加路径段。例如,app目录中的index.tsx文件与 route匹配。/
- 路由文件导出一个 React 组件作为其默认值。它可以使用.js、.jsx、.ts或.tsx扩展名。
- Android、iOS 和 Web 共享统一的导航结构
添加一个导航(路由)
在app目录下创建一个about.tsx文件,作为我们的新路由
import React from 'react';
import { View, Text } from 'react-native';


const AboutScreen: React.FC = () => {

  return <View>
    <Text>About</Text>
  </View>
}

export default AboutScreen;
在app/_layout.tsx中修改添加
import { Stack } from "expo-router";

export default function RootLayout() {
  return <Stack>
  <Stack.Screen name="/" options={{ title: '首页' }} />
  <Stack.Screen name="/about" options={{ title: '关于我们' }} />
</Stack>;
}
屏幕跳转(路由跳转)
1. 采用Link方式跳转
import { Link } from 'expo-router';
...
<Link href='/about'>跳转到关于屏</Link>
...
添加404屏幕
在app/+not-found.tsx添加+not-found.tsx文件,注意:+号是必须的
添加底部导航
在app目录下创建目录:(tabs)
在app/(tabs)目录下创建_layout.tsx
注意: (tabs)下的导航不能和/app目录下的相同,比如/app/index.tsx, /app/(tabs)/index.tsx,这在expo是不允许的,
app/(tabs)/_layout.tsx
import { Tabs } from 'expo-router';

import Ionicons from '@expo/vector-icons/Ionicons';
import FontAwesome5 from '@expo/vector-icons/FontAwesome5';
import FontAwesome from '@expo/vector-icons/FontAwesome';

export default function TabLayout() {
  return (
    <Tabs
      screenOptions={{
        tabBarActiveTintColor: '#000',
        headerStyle: {
          backgroundColor: '#99ff66',
        },
        headerShadowVisible: false,
        headerTintColor: '#000',
        tabBarInactiveTintColor: '#666',
        tabBarStyle: {
          backgroundColor: '#99ff66',
        },
      }}
    >
      <Tabs.Screen
        name="add"
        options={{
          title: '添加',
          tabBarIcon: ({ color, focused }) => (
            <FontAwesome name="users" color={color} size={24} />
          ),
        }}
      />
      <Tabs.Screen
        name="message"
        options={{
          title: '消息',
          tabBarIcon: ({ color, focused }) => (
            <Ionicons name={focused ? 'notifications-sharp' : 'notifications-outline'}  color={color} size={24} />
          ),
        }}
      />
      <Tabs.Screen
        name="about"
        options={{
          title: '我的',
          tabBarIcon: ({ color, focused }) => (
            <FontAwesome5 name={focused ? 'user-alt' : 'user'} color={color} size={24} />
          ),
        }}
      />
    </Tabs>
  );
}
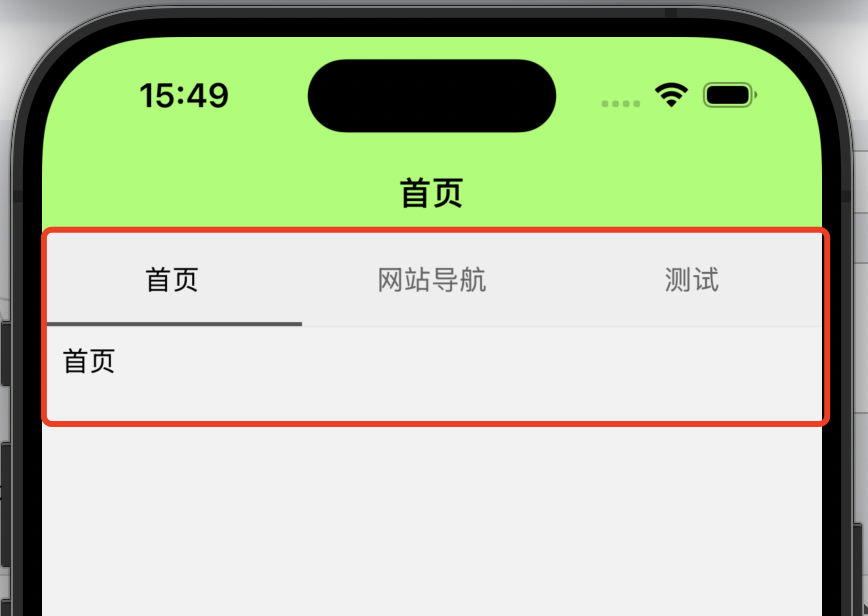
添加顶部次导航
安装
npm install @react-navigation/material-top-tabs react-native-tab-view
npm install react-native-pager-view
# Mac iOS
npx pod-install ios
使用时,我是在首页要的,之前把首页放到了底部导航里,即(tabs)/index.tsx, 所以我把index.tsx改造成下例代码
import React from "react";
import { createMaterialTopTabNavigator } from '@react-navigation/material-top-tabs';
import HomeScreen from "@/pages/Home";
import Navs from "@/pages/Navs";
import About from "@/app/about";


export default function Index() {
  const Tab = createMaterialTopTabNavigator();
  return (
    <Tab.Navigator
      screenOptions={{
        tabBarIndicatorStyle: {
          backgroundColor: '#555',
        },
        tabBarInactiveTintColor: '#666',
        tabBarStyle: {
          backgroundColor: '#eee',
          marginBottom: 10,
        },
        tabBarActiveTintColor: '#000',
      }}
    >
      <Tab.Screen name="首页" component={HomeScreen} />
      <Tab.Screen name="网站导航" component={Navs} />
      <Tab.Screen name="测试" component={About} />
    </Tab.Navigator>
  );
}